Written by Ron de Bruin, Microsoft Excel MVP.
Excel Add-Ins
A lot of Excel procedures are packaged in Add-Ins. An Add-In is basically a workbook containing some code, that has some other unique properties. An add-in usually has some user interface elements, such as dialogs (UserForms), buttons on the ribbon, or buttons on context (right-click) menus, so you can access its features.
The add-in workbook itself is invisible, though it has one and often more hidden worksheets, where information related to the add-in may be stored. The add-in can be installed, which means it opens every time Excel opens, so that its functionality is always available. An Excel add-in can also be opened like a regular file when you need it, without installing it, though it is still hidden.
Preparing to Install the Add-In
Very often, an Excel add-in is packaged in a zip file. If you download a zip file in safari it will automatically Unzip the file and you will find the add-in in your Download folder, if not double click the add-in and it will unzip.
Where do I store the add-In?
The best place to store the add-in is in the User Add-in Library, which is:
/Users/UserName/Library/Group Containers/UBF8T346G9.Office/User Content/Add-Ins
To get to this folder, open a Finder window and click on Go in the Finder menu bar; if you press and hold the Option key you will see the hidden Library folder in the list so you can click on it to open it. Now drill down to Group Containers, UBF8T346G9.Office, User Content, and then Add-Ins. The strange label “UBF8T346G9.Office” was assigned by Apple to Microsoft, and we have to live with it.
You can actually store the add-in in almost any convenient folder you want, but when you use the Add-Ins folder (above), the add-in is listed in the Excel Add-ins dialog, and you will not have to browse to find it and add it to this list.
Tip: with the Add-ins folder open in Finder, use the shortcut Command+Control+t to add a link to this folder in the Finder Favorites sidebar so it is easy to access the folder another time.
Pro Tip: Go to Setup your Mac for Mac Office. Among other hints, this page includes a script that will install shortcuts to the Add-Ins folder and several other folders on the Mac desktop.
Installing and Uninstalling the Add-In
To install the add-in, follow these simple steps.
- Open Excel.
- From the top-level Mac menubar, click the Tools menu and select Excel Add-ins… to open the Add-ins dialog.
- If the Add-In is listed, simply check it in the list.
- If the Add-In is not listed, use Browse to select it, and click Open.
- Press OK.
- Done!
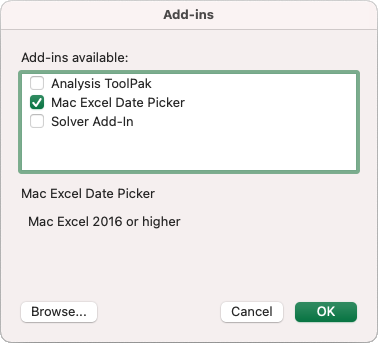
To uninstall the add-in, follow these steps.
- From the Mac menubar, click Tools and select Excel Add-ins… to open the Add-ins dialog.
- Find the Add-In in the list, and simply uncheck it.
- Press OK.
The add-in will remain on the list, to make it easy to reinstall at some future time.
Using an Excel Add-In without Installing
When you install an add-in, it will load whenever Excel opens, so it is always ready to use. If you don’t want an Excel add-in open all the time, you can simply start it when you need it, using File menu > Open in Excel or double-clicking on the add-in file in Finder. This opens the add-in, but just like an installed add-in, there is no visible workbook or worksheet in Excel.
About the Author
I’ve known Ron de Bruin for over 20 years, when we were both lurking on the Microsoft news groups, in awe of the first generation of Excel MVPs, like John Walkenbach, Chip Pearson, Bob Umlas, Ron Bovey, and Stephen Bullen. We answered more than a few questions and learned all about Excel. I’ve worked quite a bit with Excel for Mac, but Ron has become an expert on all things Mac and Excel. I became an Excel MVP in 2001, and Ron followed soon after, in 2002. Ron has been a strong advocate for users of Excel on the Mac. Ron covers many Excel and VBA topics on Excel Automation, and he covers Mac-specific Excel issues at Mac Excel Automation.


