This is the fourth part of a series that shows the steps involved in building an Excel add-in. In Build an Excel Add-In 1 – Basic Routine I showed a VBA procedure that creates a regular chart from an arbitrary rectangular range, including from a pivot table. In Build an Excel Add-In 2 – Enhanced Functionality I turned modularized this routine, so it could be called from any code that passed the appropriate settings into the function as arguments. In Build an Excel Add-In 3 – Auxiliary Modular Functions I included an additional modular function which cleans up the chart created in the previous article’s code. Because this function is widely useful, it will be made more general in a future article, after this series is finished.
In this installment of the Build an Excel Add-In series, I will show how to create a custom dialog using a VBA UserForm, a set of controls, and related code.
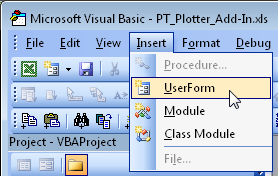
Insert UserForm
The first step in building a dialog is to insert a UserForm. In the Visual Basic Editor (VBE) select the project in the Project Explorer pane, then from the Insert menu, choose UserForm.
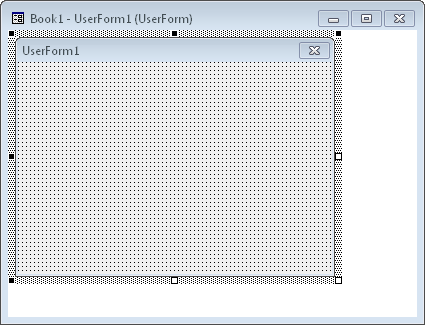
A new window is created, containing a blank UserForm.
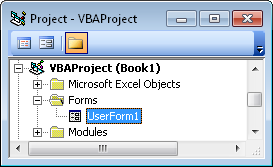
The UserForm is listed in the Project Explorer, in the Forms folder of the VB Project.
A UserForm actually consists of two parts: the Designer window and the Code window. The code window contains all of the VBA procedures that make the dialog work. For example, in the code window you will find the code that responds to button clicks.
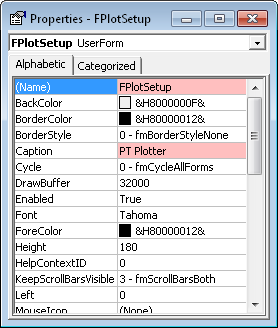
When the UserForm’s window is active, the Properties window can be used to edit the properties of the UserForm. For example, the name of the UserForm has been changed from UserForm1 (below left) to FPlotSetup (below right), and the caption has been changed from UserForm1 to PT Plotter.
– –
In addition to changing properties through the Properties window, the size of the dialog can be changed by dragging the white handles on the right and bottom edge of the UserForm.
Forms Controls
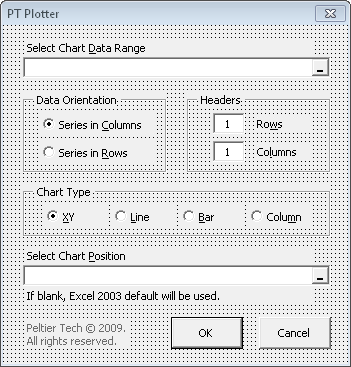
The blank UserForm shown above is transformed into the fully featured dialog shown below by adding and coding a set of controls. VBA offers a range of controls, and others can be used if additional capabilities are required. Care should be taken when using controls which are not built in, because of potential deployment complications.
The controls in this dialog are listed below, in top-down and left-to-right order:
- lblChartData
- refChartData
- fraOrientation
- optByRow
- optByColumn
- fraHeaders
- txtHeaderRows
- lblHeaderRows
- txtHeaderColumns
- lblHeaderColumns
- fraChartType
- optChartTypeXY
- optChartTypeLine
- optChartTypeBar
- optChartTypeColumn
- lblChartPosition
- refChartPosition
- lblChartPosition2
- lblCopyright
- btnOK
- btnCancel
I have used a simple naming convention:
Three letter prefixes identify the type of control: lbl for label, ref for RefEdit, fra for frame, opt for option button, txt for text boxes, btn for command buttons (some developers use cmd for command button, but I think btn is more descriptive)). Not used in this dialog are chk for check box, mpg for multipage, lst for list box, cbo for combo box, scr for scroll bar, spn for spin button, img for image.
The purpose of each control is encoded into its name. For example, optChartTypeXY is for choosing the XY Chart Type option, refChartData is the RefEdit used to select the chart data, etc.
Controls Toolbox
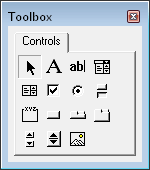
When a UserForm is the active window, the Controls Toolbox appears. This is a toolbar-like window that contains VBA controls as well as other controls that you may have added.
To add a control to the dialog, click on its icon in the Controls Toolbox. When the cursor is moved over the UserForm, it changes to a cross hair and the selected icon is shown below the icon to remind you what control you’re adding. Click and drag to draw a rectangle as large as the control you are adding.
When you release the mouse, the control appears, highlighted with white resizing handles.
After a control is added, its name and other properties can be set in the Property window, just as the name and caption of the UserForm itself were set.
Labels and Text Boxes
Labels simply contain text that guides the user through the dialog. The user cannot change the caption of a label, but the caption can be controlled by code in response to certain conditions.
Text boxes allow a user to specify values which can be represented as text. These values may be numerical, but it is up to the programmer to deal with number formats of entered and displayed numbers. In our dialog, text boxes are used to specify the number of header rows and columns in the chart source data.
Frames
Frames are used to give some order to the dialog, grouping together related controls. Our dialog has three frames, containing controls for selection of data orientation, header rows and columns, and chart type.
Option Buttons and Checkboxes
Option buttons are used to let a user select from among several options. All option buttons within a frame or with the same GroupName property are grouped together, such that only one can be true (selected) at once, and changing one to true automatically changes the others in its group to false. In this frame, only the XY option is selected.
When the Line option is selected, the XY option is unselected.
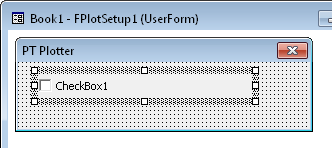
Check boxes are used to let a user set a true (checked) or false (unchecked) value. In the absence of event code in the UserForm, check box values are independent of each other.
List Boxes and Combo Boxes
List boxes and combo boxes allow the user to select one or more items from a list. A list box is more user friendly because it shows the whole list (or at least a subset of the list) while the combo box only shows the selected item, unless the user clicks to expand the list.
Command Buttons
Command Buttons allow a user to initiate an action, in our case, approving or canceling the session with the dialog. Clicking the button runs code that carries out the user’s command.
RefEdit Controls
RefEdit controls allow the user to select a range of cells with the mouse. While the user is selecting cells, the UserForm shrinks to the size of the RefEdit plus the title bar. The address of the selected range appears in the RefEdit and updates as the mouse is dragged, and the size of the selected range is displayed next to the cursor.
When the mouse is released, the UserForm returns to its original size, and the address remains in the RefEdit.
Read more about the RefEdit control in Using RefEdit Controls in Excel Dialogs.
Adding Code
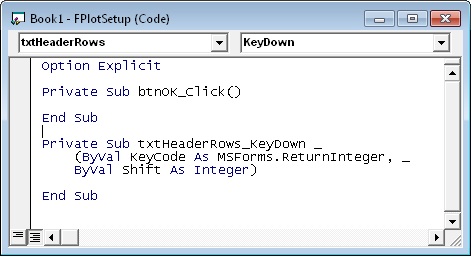
There is a simple way to add code to the UserForm. Double click on a control, and the UserForm’s code window opens. An empty event procedure for the default method (action) of the control is added to the code window. For example, double clicking on the OK button adds the btnOK_Click event procedure stub to the code.
You enter the code you want to run on the OK button click event into this procedure stub. The following shows a call to a function that validates the user’s selections. If selections are valid, the code hides the form, sending execution back to the procedure that showed the UserForm. If selections are invalid, the user sees a message and decides whether to continue or bail out.
Notice the two dropdowns at the top of the code window. The selected control, btnOK, is shown in the left dropdown, and the Click event is shown in the right dropdown. You can use these dropdowns to select any event that’s available for any control. It’s a good idea to use these dropdowns to define your procedures, because some events include arguments, and the dropdowns will always get the arguments correct.
For example, the KeyDown event of a text box control includes the KeyCode (the ASCII code of the key that was pressed) and the Shift (whether Shift, Alt, and/or Ctrl were down when the key was pressed) arguments. When the procedure runs, Excel passes these values into the procedure, so the code knows which key was pressed, under which shift state.
The UserForm code module can contain event procedures, as well as functions and subs that can be called by these event procedures. For example, the Validated function called by the btnOK_Click event is also found in the UserForm’s code. Procedures in the UserForm can also call procedures in other modules.
The Code Behind the Dialog
The complete listing of the Userform’s code is presented below.
The UserForm_Initialize event loads the selected range address into the RefEdit.
The Validated function checks the RefEdit for a valid range and the header text boxes for valid numbers of header rows and columns.
The various property procedures are used called by the main routine to extract information from the UserForm. I wrote about this technique in Property Procedures – Passing Information to and from Forms.
The mbCancel variable is True if the Cancel button is clicked. The Cancel property checks this variable and tells the main routine if the user canceled the dialog.
Option Explicit
Private mbCancel As Boolean
Private Sub btnCancel_Click()
mbCancel = True
Me.Hide
End Sub
Private Sub btnOK_Click()
Dim sMessage As String
Dim lResponse As VbMsgBoxResult
If Validated(sMessage) Then
mbCancel = False
Me.Hide
Else
lResponse = MsgBox(sMessage, vbRetryCancel, "Invalid Information")
If lResponse = vbCancel Then
btnCancel_Click
End If
End If
End Sub
Public Property Get Cancel() As Boolean
Cancel = mbCancel
End Property
Public Property Get DataOrientation() As XlRowCol
Select Case True
Case Me.optByColumn.Value
DataOrientation = xlColumns
Case Me.optByRow.Value
DataOrientation = xlRows
End Select
End Property
Public Property Get HeaderRows() As Long
HeaderRows = Val(Me.txtHeaderRows.Text)
End Property
Public Property Get HeaderColumns() As Long
HeaderColumns = Val(Me.txtHeaderColumns.Text)
End Property
Public Property Get ChartType() As XlChartType
Select Case True
Case Me.optChartTypeXY.Value
ChartType = xlXYScatterLines
Case Me.optChartTypeLine.Value
ChartType = xlLineMarkers
Case Me.optChartTypeBar.Value
ChartType = xlBarClustered
Case Me.optChartTypeColumn.Value
ChartType = xlColumnClustered
End Select
End Property
Public Property Get ChartDataRange() As Range
Set ChartDataRange = Range(Me.refChartData.Text)
End Property
Public Property Get ChartPosition() As Range
On Error Resume Next
Set ChartPosition = Range(Me.refChartPosition.Text)
On Error GoTo 0
End Property
Private Function Validated(sMsg As String) As Boolean
' Minimalist input validation
Dim rTest As Range
Dim iTest As Long
Validated = True
On Error Resume Next
Set rTest = Range(Me.refChartData.Text)
On Error GoTo 0
If rTest Is Nothing Then
Validated = False
sMsg = "Invalid data range selected."
GoTo ExitFunction
End If
iTest = Me.HeaderRows
If iTest >= rTest.Rows.Count Then
Validated = False
sMsg = "Too many header rows specified."
GoTo ExitFunction
End If
iTest = Me.HeaderColumns
If iTest >= rTest.Columns.Count Then
Validated = False
If Len(sMsg) > 0 Then sMsg = sMsg & vbNewLine
sMsg = sMsg & "Too many header columns specified."
GoTo ExitFunction
End If
ExitFunction:
End Function
Private Sub UserForm_Initialize()
' Define current range for RefEdit, if applicable
Dim sAddress As String
If TypeName(Selection) = "Range" Then
If Selection.Cells.Count = 1 Then
sAddress = Selection.CurrentRegion.Address(External:=True)
Else
sAddress = Selection.Address(External:=True)
End If
sAddress = Mid$(sAddress, InStr(sAddress, "]") + 1)
If InStr(sAddress, "'") > 0 Then
sAddress = "'" & sAddress
End If
Me.refChartData.Text = sAddress
End If
End Sub
Private Sub UserForm_QueryClose(Cancel As Integer, CloseMode As Integer)
If CloseMode = vbFormControlMenu Then
Cancel = True
btnCancel_Click
End If
End Sub
In the next article of the series, Build an Excel Add-In 5 – Tie the Code Together, we will develop code to call this dialog, extract the user selections, and produce a chart using these settings.
Contents: How to Build an Excel Add-In
- Build an Excel Add-In 1 – Basic Routine
- Build an Excel Add-In 2 – Enhanced Functionality
- Build an Excel Add-In 3 – Auxiliary Modular Functions
- Build an Excel Add-In 4 – Create the Dialog
- Build an Excel Add-In 5 – Tie the Code Together
- Build an Excel Add-In 6 – Interface for 2003
- Build an Excel Add-In 7 – Interface for 2007
- Build an Excel Add-In 8 – Last Steps
- Build an Excel Add-In 9 – Deployment